Getting started with Khadas VIM3

Khadas VIM3 – a single board computer like a Raspberry Pi or Jetson Nano – but with more powerful processors.

Uses Amlogic A311D SoC and includes a neural processing unit for accelerating machine learning models and AI computations

Ideal for embedded computer vision or deep learning projects!

Installing Linux

The VIM3 comes with an Android OS pre-loaded which we need to replace for Linux. Khadas have good documentation for how to do this.

First setup a workspace for Khadas on the host machine (Ubuntu 20).

cd ~
mkdir Khadas
cd Khadas

Choosing OS Image

The first step is to choose an OS. Some decisions to make:

  • What kernel to use: can choose between the older more stable 4.9 kernel, or the latest (less stable?) mainline kernel.
  • Where to store the OS on the board: can install the image on an SD card and insert it into the slot, or, can flash the OS directly to the onboard storage. The onboard eMMC is faster and more stable than SD cards.
  • Whether to have command line only or install the desktop GUI: we wanted the full desktop as we will want to be able to use the GUI when out and about.

This case: use the VIM3_Ubuntu-gnome-focal_Linux-4.9_arm64_EMMC_V1.0.9-211217 image as we want the desktop Ubuntu installed in eMMC with 4.9 kernel.

Flashing OS Image

Make a separate directory for OS images and download the image

mkdir images
curl https://dl.khadas.com/Firmware/VIM3/Ubuntu/EMMC/VIM3_Ubuntu-gnome-focal_Linux-4.9_arm64_EMMC_V1.0.9-211217.img.xz --output images/VIM3_Ubuntu-gnome-focal_Linux-4.9_arm64_EMMC_V1.0.9-211217.img.xz

extract the the file using unxz.

unxz images/VIM3_Ubuntu-gnome-focal_Linux-4.9_arm64_EMMC_V1.0.9-211217.img.xz

To load the OS image onto the board we need the Khadas burning tool. Install the dependencies for disk tools first.

sudo apt-get install libusb-dev git parted

Then download the Khadas utils repository using git

git clone https://github.com/khadas/utils
cd utils

Then to setup the imaging tool:

sudo ./INSTALL

To flash the image and load the new OS, the board needs to be booted into upgrade mode.

  1. Connect the board to the host PC using the USB C connection.
  2. After its connected, wait for the board to boot up and its red LED to light up.
  3. Find the power button and reset button. Power is one of the 3 buttons, closest to the GPIO pins. Reset is one of the 3 buttons, closest to the USB port.
  4. While holding the power button, click the reset button, and continue to hold the power button for 3 seconds afterwards.
  5. The LED should blink and end up white.
  6. To confirm the board is in upgrade mode, type
lsusb | grep Amlogic

Should see something like:

BUS 002 Device 036: ID 1b8e:c003 Amlogic, Inc.

Otherwise, do the upgrade mode sequence again. When you can see the Amlogic listed like above, run the burn tool.

burn-tool -v aml -b VIM3 -i ../images/VIM3_Ubuntu-gnome-focal_Linux-4.9_arm64_EMMC_V1.0.9-211217.img

Should see output like:

dan@antec:~/Khadas/utils$ burn-tool -v aml -b VIM3 -i ../images/VIM3_Ubuntu-gnome-focal_Linux-4.9_arm64_EMMC_V1.0.9-211217.img
Try to burn Amlogic image...
Burning image '../images/VIM3_Ubuntu-gnome-focal_Linux-4.9_arm64_EMMC_V1.0.9-211217.img' for 'VIM3/VIM3L' to eMMC...
Rebooting the board ........[OK]
Unpacking image [OK]
Initializing ddr ........[OK]
Running u-boot ........[OK]
Create partitions [OK]
Writing device tree [OK]
Writing bootloader [OK]
Wiping  data partition [OK]
Wiping  cache partition [OK]
Writing logo partition [OK]
Writing rootfs partition [OK]
Resetting board [OK]
Time elapsed: 8 minute(s).
Done!
Sat 19 Feb 17:45:01 GMT 2022

Running object detection on the NPU

Follow the Tengine docs

Getting started with Tengine

Tengine

A cross platform machine learning deployment solution.

Enable fast and efficient deployment of deep learning neural network models on embedded devices.

Uses a separated front-end/back-end design. I.e. a single model can be transplanted and deployed onto multiple hardware platforms like CPU, GPU, NPU and so on.

Code once, run anywhere – and make use of acceleration.

We want to develop on x86, and deploy to ARM and NPU accelerator.

Tengine logo

Installation

Follow these steps for installing Tengine.

Make a workspace and then download the Tengine code:

cd ~
mkdir Tengine
cd Tengine
git clone -b tengine-lite https://github.com/OAID/Tengine.git

Then setup a build directory to store the compiled files:

cd Tengine-Lite
mkdir build 
cd build

Then build the files. Use -j 12 when calling make to use multi-core and speed up compilation. Change 12 to however many threads/cores the PC has.

cmake ..
make -j 12
make install

Confirm the installation was okay by using tree.

sudo apt-get install tree
tree install

The output should look like this

install
├── bin
│   ├── tm_classification
│   ├── tm_classification_int8
│   ├── tm_classification_uint8
│   ├── tm_efficientdet
│   ├── tm_efficientdet_uint8
│   ├── tm_landmark
│   ├── tm_landmark_uint8
│   ├── tm_mobilefacenet
│   ├── tm_mobilefacenet_uint8
│   ├── tm_mobilenet_ssd
│   ├── tm_mobilenet_ssd_uint8
│   ├── tm_retinaface
│   ├── tm_ultraface
│   ├── tm_yolofastest
│   └── tm_yolov5
├── include
│   └── tengine
│       ├── c_api.h
│       └── defines.h
└── lib
    ├── libtengine-lite.so
    └── libtengine-lite-static.a

Test inference

The examples page walks through running Tengine demos.

First make a folder to store the models in the root of the Tengine directory.

cd ~/Tengine/Tengine-Lite
mkdir models
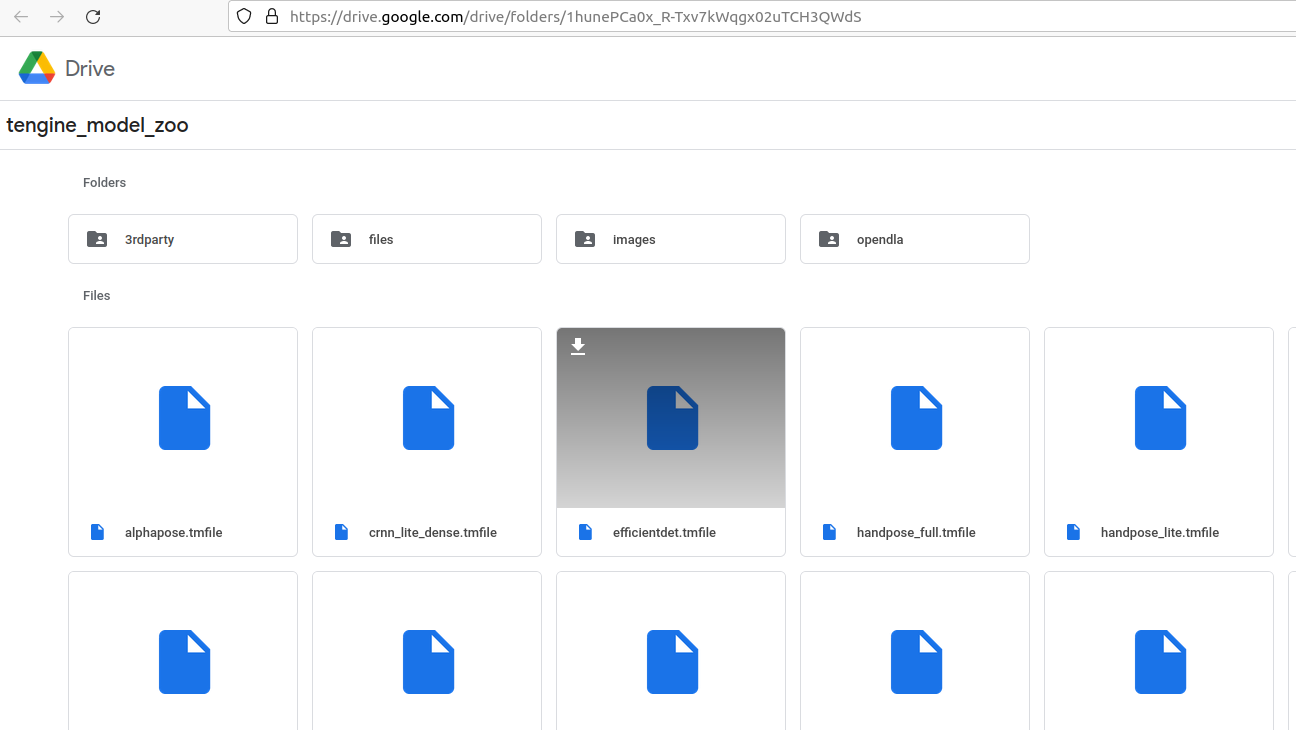
  • Download the efficientdet.tmfile model from the model zoo. Save it in to the models directory.
Download the model from the Google drive model zoo

Create another folder to store our test images.

mkdir images

Then download an image to detect, e.g.

curl https://camo.githubusercontent.com/beb822ba942ae1904a1355586fd964b8a2374a6ebf31a1e10c1cf41243e3d784/68747470733a2f2f7a332e617831782e636f6d2f323032312f30362f33302f5242566471312e6a7067 --output images/ssd_dog.jpg
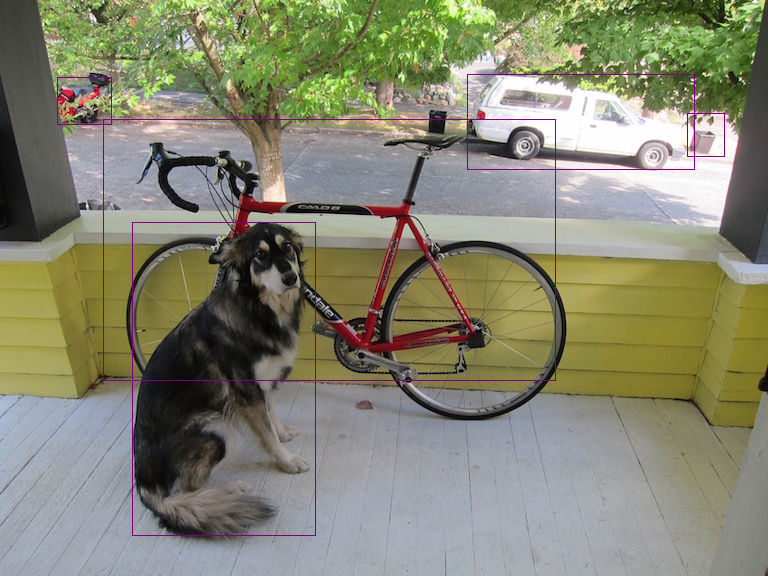
the dog

Use the command from the example – it exports the path for the Tengine-library first, and then runs the detector.

export LD_LIBRARY_PATH=./build/install/lib
./build/install/bin/tm_efficientdet -m models/efficientdet.tmfile -i images/ssd_dog.jpg -r 1 -t 1

Should see some output – the detector worked successfully.

dan@antec:~/Tengine/Tengine-Lite$ ./build/install/bin/tm_efficientdet -m models/efficientdet.tmfile -i images/ssd_dog.jpeg -r 1 -t 1

Image height not specified, use default 512
Image width not specified, use default  512
Scale value not specified, use default  0.017, 0.018, 0.017
Mean value not specified, use default   123.7, 116.3, 103.5
tengine-lite library version: 1.5-dev

model file : models/efficientdet.tmfile
image file : images/ssd_dog.jpeg
img_h, img_w, scale[3], mean[3] : 512 512 , 0.017 0.018 0.017, 123.7 116.3 103.5
Repeat 1 times, thread 1, avg time 512.70 ms, max_time 512.70 ms, min_time 512.70 ms
--------------------------------------
17:  80%, [ 132,  222,  315,  535], dog
 7:  73%, [ 467,   74,  694,  169], truck
 1:  42%, [ 103,  119,  555,  380], bicycle
 2:  29%, [ 687,  113,  724,  156], car
 2:  25%, [  57,   77,  111,  124], car
the dog with detection’s

Parsing Command Line Arguments in C

The getopt API can help us parse command line arguments in C.

Its included with C so we only need to “#include <unistd.h> at the top and then configure how we want to parse the arguments.

The getopt function takes argc and argv as initial arguments, and then we specify in the third what characters to use as options. E.g. If we specify “a” then the user can specify an option “-a” on the command line.

getopt(argc, argv, "a")
./some_program -a

If we specify “abc”, then the user can specify -a, -b or -c on the command line. E.g.

getopt(argc, argv, "abc")
./some_program -a -b -c

If we want to specify a value for an argument then we add a colon after the character. E.g.

getopt(argc, argv, "a:b:c:")
./some_program -a "argument for a" -b "argument for b" -c "argument for c"

The getopt function returns either the character of the option it has just parsed, or if there are no arguments then it returns -1. The specified value given with each argument is stored in optarg. We combine this with a switch case to act on the arguments given.

#include <stdio.h>
#include <stdlib.h>
#include <stdbool.h>
#include <unistd.h> // getOpt functions

int main(int argc, char *argv[]) {

    printf("Running parser test\n"); fflush(stdout);

    int opt; // i.e. option

    int input_number = 0;
    int output_number = 0;
    bool switch_on = false;
    
    while ((opt = getopt(argc, argv, "i:o:s")) != -1) {
        switch (opt) {
            case 'i':
                input_number = atoi(optarg);
                break;
            case 'o': 
                output_number = atoi(optarg);
                break;
            case 's':
                switch_on = true;
                break;
            default:
                fprintf(stderr, "Usage: %s [-i] [input number] [-o] [output number] [-s]\n", argv[0]);
                exit(EXIT_FAILURE);
        }
    }

    printf("The user specified %d as the input number\n", input_number);
    printf("The user specified %d as the output number\n", output_number);
    printf("The switch is %d\n", switch_on);

    return 0;
}

Getting Started with PortAudio

I have some ideas for audio projects using raspberry pi and Linux and PortAudio seems to be a pretty standard library for getting audio I/O from the machine. Also its cross platform and written in C.

On a Linux machine download the latest PortAudio release from their website.

wget http://portaudio.com/archives/pa_stable_v190600_20161030.tgz

Then follow the instructions on their installation page. We need to install ALSA first.

sudo apt-get install libasound-dev

Then extract the downloaded code.

tar -xzvf pa_stable_v190600_20161030.tgz
cd portaudio

It is easy to build the software, run

./configure && make

To install portaudio on our system so we can import it in our programs use:

sudo make install

To test everything is working correctly, we can change into the examples directory and run one of the examples.

cd examples/

We can compile an example using gcc and link in the extra dependencies. The “-l”s are where we link in extra code.

gcc -o pa_devs pa_devs.c -lrt -lasound -ljack -lpthread -lportaudio

Running the compiled pa_devs program should print out information about each of the connected audio devices on the system

./pa_devs

Compiling OpenPose for GPU and Python

First install CUDA 10.1. Go to the releases page for NVIDIA and download the installer for Cuda 10.1, Windows 10.

After the installer has finished, download CUDNN 7.5 from the NVIDIA archive and install into cuda 10.1. To install, extract the CUDNN download and then copy the CUDNN bin file to the CUDA 10.1 bin directory, the CUDNN include file into the CUDA include directory, and the CUDNN lib file into the CUDA lib directory.

Now open a PowerShell in the C: drive or wherever we want to install OpenPose and enter:

git clone https://github.com/CMU-Perceptual-Computing-Lab/openpose
cd openpose

There are a few submodules in the OpenPose code that do not download automatically (like pybind, clang and caffe modules). We need to issue an extra command to download the submodules.

git submodule update --init --recursive

To configure and compile OpenPose use CMake (I used 3.17), so download and install that; and we also need the Visual Studio 2017 compiler tools so download and install that as well. If you already have Visual Studio installed you should be able to use the Visual Studio installer to install 2017 tool chains. Also for this to work with Python we need to make sure that our Python interpreter is installed, I have Anaconda installed, CMake should find it automatically.

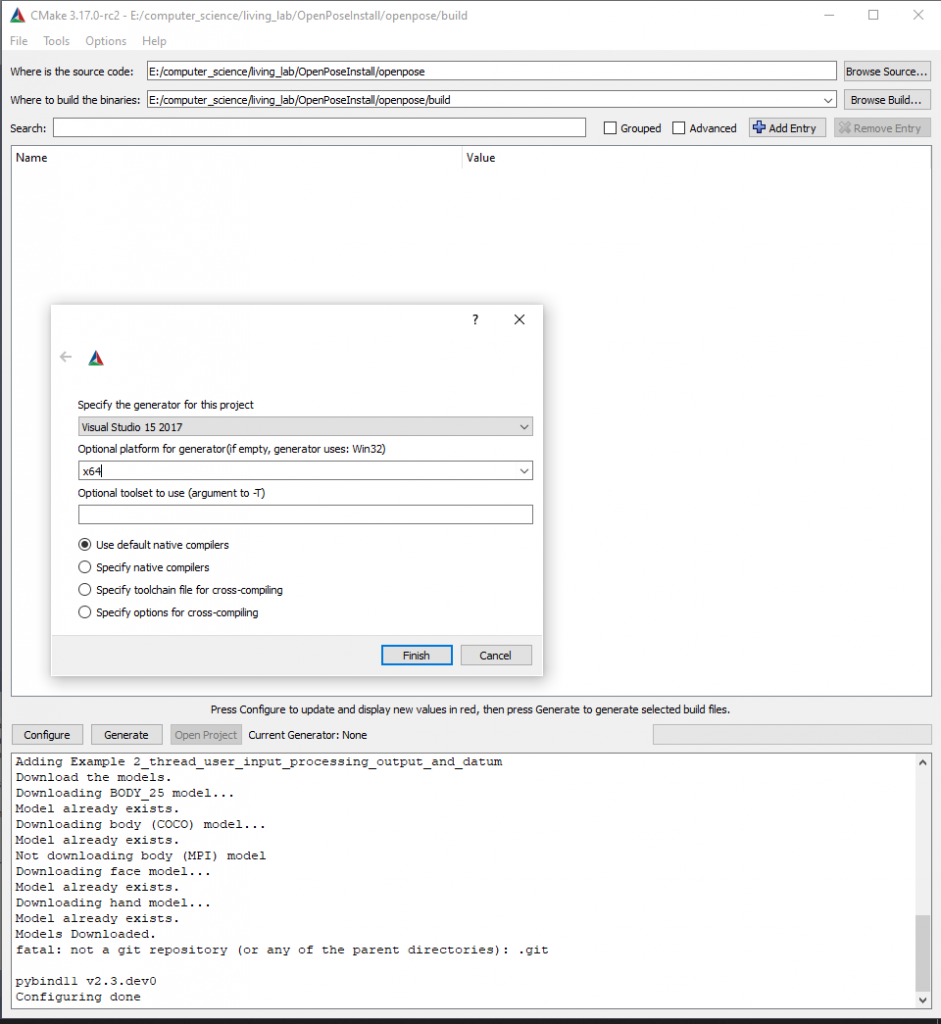
CMake is used to configure and prepare the software for our system before it is run through a compiler and turned into executables. Open CMake and click “browse source” button to set the location of the OpenPose code. E.g. select E:\OpenPoseDemo\openpose. Then click “browse build” to set the specify where to save the compiled code. Standard practice is to save the compiled executables to a folder called “build” inside the root directory of the OpenPose code. I.e. make a new folder in the E:\OpenPoseDemo\openpose directory called “build”, then select E:\OpenPoseDemo\openpose\build as the location to build the binaries.

Screenshot (78)

Click the configure button and select VS 2017 as our generator, x64 as the platform, leave the last entry blank and use default native compilers. The CMake program will use the make files in the repo to configure and download any extra dependencies and files.

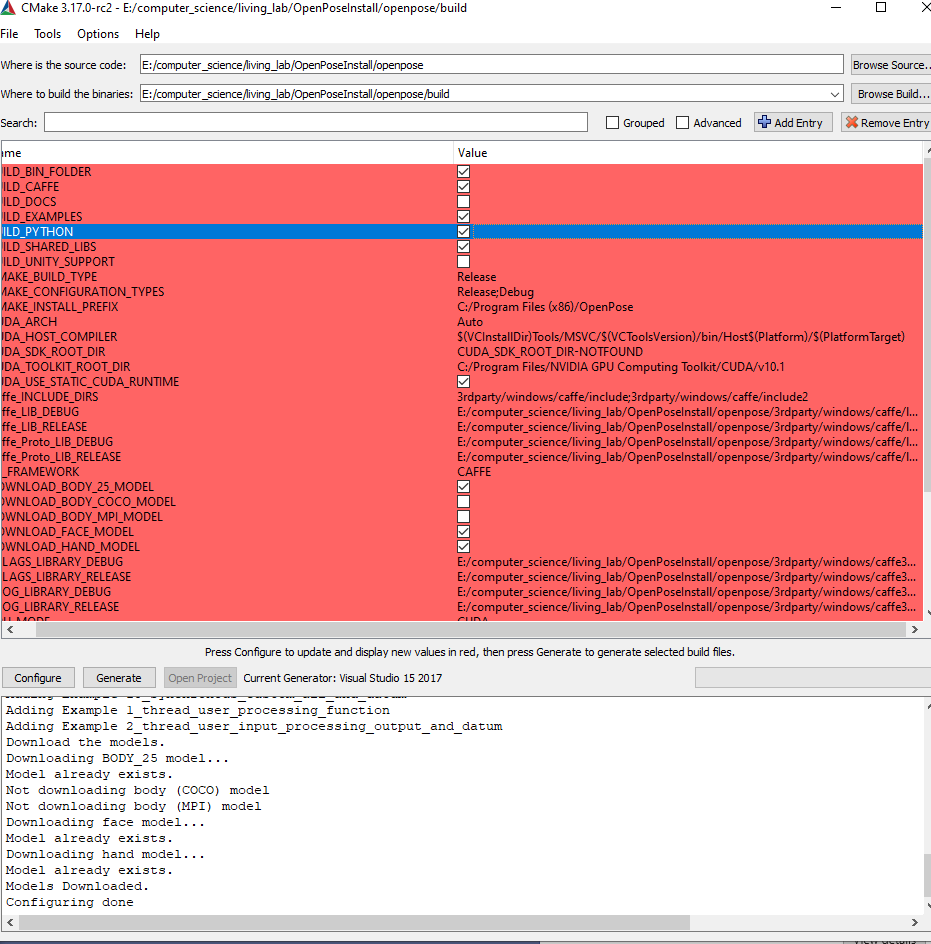
When the configuration is done CMake should be populated with parameters of the build. We want to build the Python API so find the BUILD_PYTHON option and enable it by clicking the tickbox. I also wanted the COCO 18 point estimation model so I checked the DOWNLOAD_BODY_COCO_MODEL option. Then click Generate to prepare the software for compilation. It will take a while to download the extra models as well.

Screenshot (80)

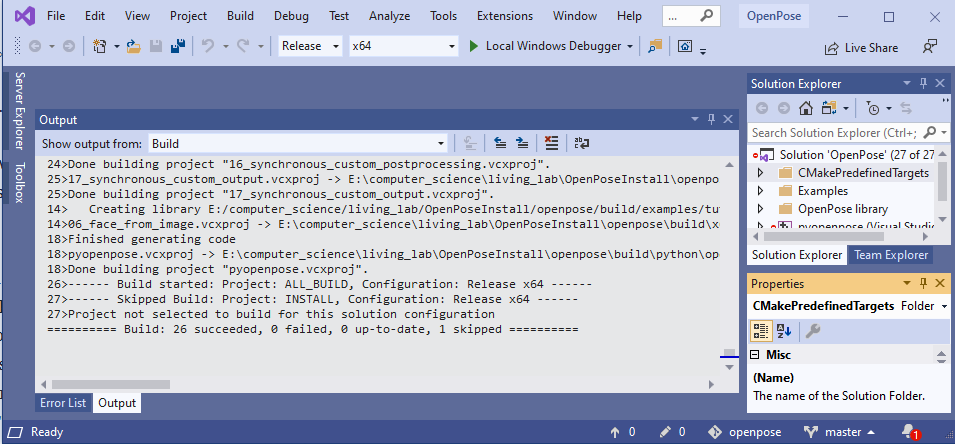
Assuming there were no errors, we should be able to click the Open Project button which will open up Visual Studio with the configured OpenPose code for compilation. Next to the green play button use the drop down to set to “release” mode and “x64” mode then in the tool bar click build -> build solution.

Screenshot (81)

Assuming that has run without errors, we can now test the code. Back in the PowerShell, change into the build/examples/tutorial_api_python directory and run an example and hopefully see some positive output.

cd \build\examples\tutorial_api_python
python 01_body_from_image.py
Screenshot (82)

Adding a USB Speaker to Raspberry Pi

I bought a simple USB speaker for my raspberry pi. I plugged it in and… it didnt work. Here is how to configure it.

Use arecord to record a sample, then use aplay to play it back and test the audio output. In my case the sound comes out the headphones but not the USB speaker.

arecord -Dac108 -f S32_LE -r 16000 -c 4 hello.wav
aplay hello.wav

In the home or root folder (e.g. home/pi/) there is file called .asoundrc which describes the audio configuration.

cd ~
sudo nano .asoundrc

This should bring up nano with a file like this:

pcm.!default {
  type asym
  playback.pcm {
    type plug
    slave.pcm "output"
  }
  capture.pcm {
    type plug
    slave.pcm "input"
  }
}

pcm.output {
  type hw
  card 0
}

ctl.!default {
  type hw
  card 0
}

Notice the card attributes are set to 0. Exit .asoundrc and then use aplay to list the available output devices

# Ctrl + X
aplay -l

You should see something like this…

pi@raspberrypi:~ $ aplay -l
**** List of PLAYBACK Hardware Devices ****
card 0: Headphones [bcm2835 Headphones], device 0: bcm2835 Headphones [bcm2835 Headphones]
  Subdevices: 8/8
  Subdevice #0: subdevice #0
  Subdevice #1: subdevice #1
  Subdevice #2: subdevice #2
  Subdevice #3: subdevice #3
  Subdevice #4: subdevice #4
  Subdevice #5: subdevice #5
  Subdevice #6: subdevice #6
  Subdevice #7: subdevice #7
card 1: Device [USB2.0 Device], device 0: USB Audio [USB Audio]
  Subdevices: 1/1
  Subdevice #0: subdevice #0

Here it says card 0 is the headphones, and the USB is card 1. In the configuration file the cards are set to 0 i.e. the headphones.

We need to change asoundrc to use card 1. Go back into .asoundrc in nano and change it.

sudo nano .asoundrc
pcm.!default {
  type asym
  playback.pcm {
    type plug
    slave.pcm "output"
  }
  capture.pcm {
    type plug
    slave.pcm "input"
  }
}

pcm.output {
  type hw
  card 1
}

ctl.!default {
  type hw
  card 1
}

Exit Nano and save it, then test it again. Using aplay hello.wav. If there is still no sound try and change the volume using the alsamixer

aplay hello.wav
alsamixer

Install Home Assistant on a Raspberry Pi

First setup a basic raspberry pi. Then follow the steps in the manual home assistant installation.

In this case the commands on the home assistant guide did not install some packages, but we can install them manually.

sudo apt-get install libopenjp2-7-dev
sudo apt-get install libtiff-tools

After testing using the “hass” command and checking the page at the raspberry pi’s ip address + :8123, then need to set home assistant to run in the background as a daemon using another guide they provided.

Raspberry Pi Home Server

Setup a raspberry pi home server using Windows, raspberry pi OS Lite, balena etcher, WIFI and SSH. Get a basic local linux server running at home.

First we need a raspberry pi (3), an SD card (32GB+ recomended), an SD card reader (e.g. a USB SD card reader) and a power supply for the pi (USB power can be unstable).

Plug in the SD card to a Windows machine and format it using PowerShell. Type:

diskpart
list disk # Look for which disk number is the SD card using the details
select disk <disk_number_here>
detail disk # Check you have selected the right disk
clean # Wipe the disk clean
exit

Then open Windows disk management tool (e.g. search for disk management), right click the SD card and new volume. Use FAT32. Name the drive letter P for Pi

Then download balena etcher and the raspbian lite Linux distribution, and user balena etcher to burn raspbian onto the SD card. Remove the SD card when etcher has checked and confirmed it wrote successfully, then re-insert after a few seconds.

Go back into PowerShell and cd P:\ or change into whatever you named the SD card.

To enable SSH on first boot create type New-Item SSH. Then create a configuration file for the WIFI settings using New-Item wpa_supplicant.conf.

Open wpa_supplicant.conf with a command like code wpa_supplicant.conf or notepad wpa_supplicant.conf and then add this information where ssid is the name of your router and psk is the router password.

country=GB
ctrl_interface=DIR=/var/run/wpa_supplicant GROUP=netdev
update_config=1
network={
 ssid="YOURSSID"
 scan_ssid=1
 psk="YOURPASSWORD"
 key_mgmt=WPA-PSK
}

The SD card is now ready to go in the raspberry pi for first boot. After a few minutes it will show up on your router page. Log into the pi using ssh pi@raspberrypi password: raspberry or use pi@ipaddress e.g. pi@192.168.1.52

14. If we have used the pi on this network before and get this warning:

@@@@@@@@@@@@@@@@@@@@@@@@@@@@@@@@@@@@@@@@@@@@@@@@@@@@@@@@@@@
@ WARNING: POSSIBLE DNS SPOOFING DETECTED! @
@@@@@@@@@@@@@@@@@@@@@@@@@@@@@@@@@@@@@@@@@@@@@@@@@@@@@@@@@@@
The ECDSA host key for raspberrypi has changed,
and the key for the corresponding IP address 192.168.0.27
is unknown. This could either mean that
DNS SPOOFING is happening or the IP address for the host
and its host key have changed at the same time.
@@@@@@@@@@@@@@@@@@@@@@@@@@@@@@@@@@@@@@@@@@@@@@@@@@@@@@@@@@@
@ WARNING: REMOTE HOST IDENTIFICATION HAS CHANGED! @
@@@@@@@@@@@@@@@@@@@@@@@@@@@@@@@@@@@@@@@@@@@@@@@@@@@@@@@@@@@

Then type ssh-keygen -R raspberrypi or ssh-keygen -R <pi-ip_address> to reset it, then try log in again.

Once logged in change the password using passwd command, and do a sudo apt-get update and then sudo apt-get -y upgrade to update the the raspberry pi.